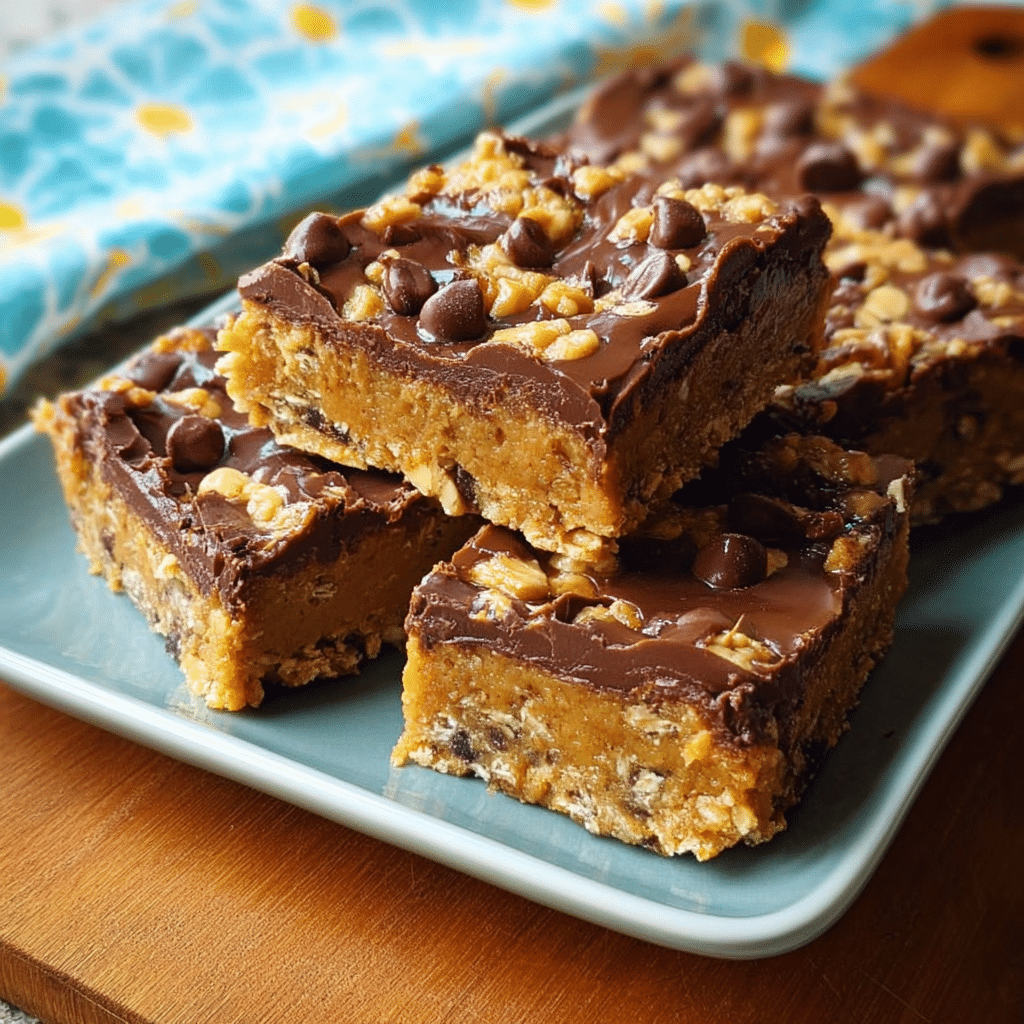
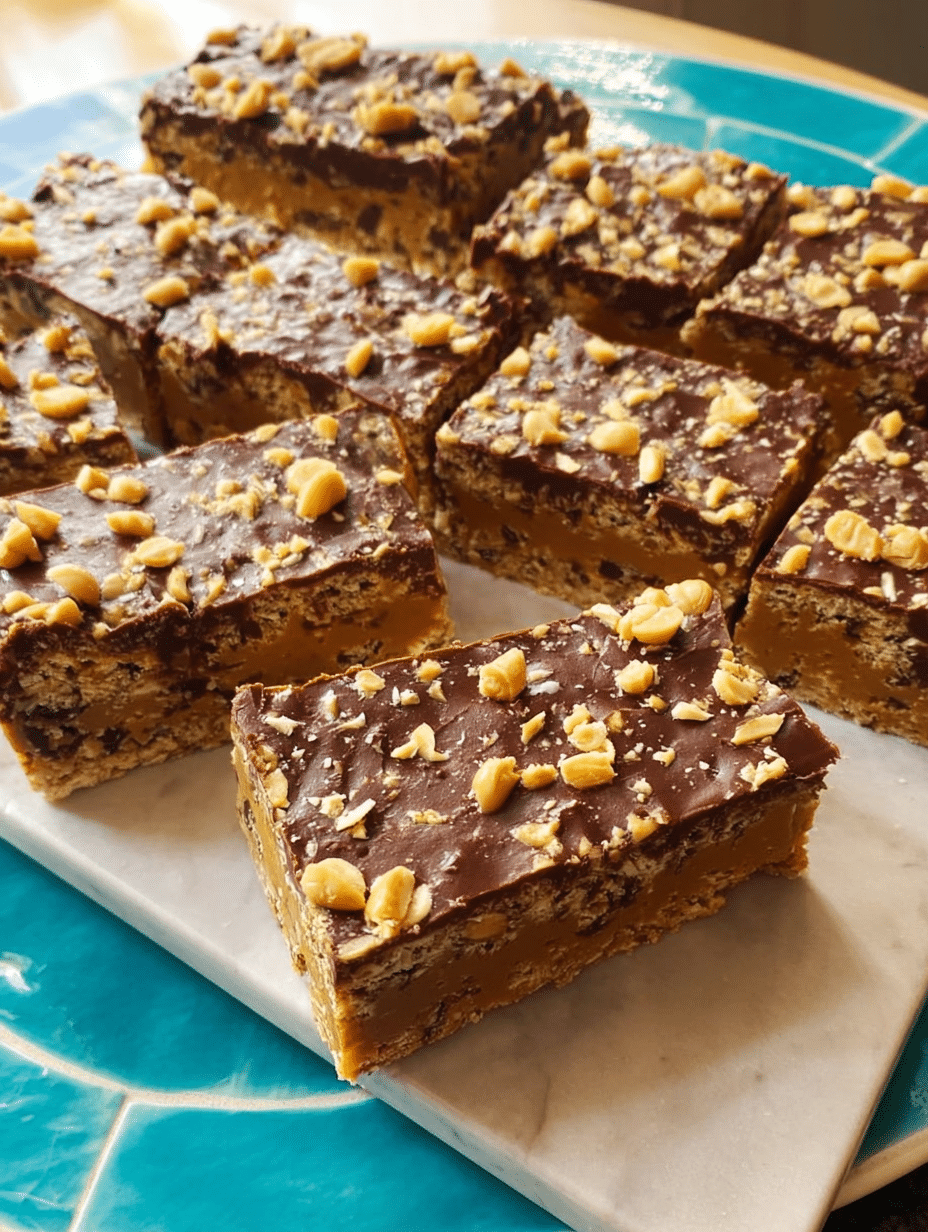
Easy sugar-free peanut butter bars provide a dense, protein-rich snack option that combines the salty richness of creamy nut butter with a satisfying chocolate topping. This recipe utilizes sugar-free alternatives to traditional staples to ensure a low-glycemic index while maintaining the firm, fudge-like texture that enthusiasts of this classic treat expect. You can prepare these bars in under twenty minutes to fuel your post-workout recovery or satisfy mid-afternoon cravings with high-quality fats and proteins.
| Prep Time | Cook Time | Total Time | Servings | Difficulty | Cuisine |
|---|---|---|---|---|---|
| 15 Minutes | 5 Minutes | 20 Minutes | 16 Bars | Easy | American |
Why This Recipe Works
This recipe successfully balances texture and nutritional density by combining three distinct types of peanut inputs to create a complex mouthfeel. I found that the mixture of smooth and chunky peanut butter provides enough structural integrity to hold the bars together without requiring flour or baking. The use of crushed vanilla wafers acts as a binding agent that absorbs excess oils from the natural fats in the butter and nuts.
I have optimized this version to focus on satiety and energy stability through the incorporation of calorie-dense ingredients that do not trigger rapid insulin spikes. The inclusion of chopped peanuts adds a necessary crunch that breaks up the softness of the base layer. By melting the chocolate chips with a small portion of creamy peanut butter, the top layer remains soft enough to bite through without cracking or shattering like solid chocolate.
Ingredients
| Ingredient | Quantity | Notes and Alternatives |
|---|---|---|
| Butter (Softened) | 1 cup (2 sticks) | Use grass-fed butter for higher nutrient density; substitute with coconut oil for dairy-free. |
| Chunky Peanut Butter | 1 cup | Choose a brand with only peanuts and salt; almond butter works as a nutty alternative. |
| Creamy Peanut Butter | 1/2 cup | Reserved for the chocolate topping to keep it smooth and pliable after refrigeration. |
| Sugar-Free Powdered Sugar | 2 cups | Erythritol or Monk Fruit blends work best; sift before using to prevent clumping in the base. |
| Vanilla Wafers | 1 (12-oz.) box | Pulse into fine crumbs; use almond flour-based cookies for a completely grain-free option. |
| Semi-Sweet Chocolate Chips | 2 cups | Use stevia-sweetened chips to maintain the sugar-free profile of the dessert. |
| Mini Chocolate Chips | 1 (12-oz.) bag | Adding these to the base provides extra texture and pockets of chocolate flavor. |
| Chopped Peanuts | 1/2 cup | Roasted and salted peanuts enhance the flavor profile and provide a decorative finish. |
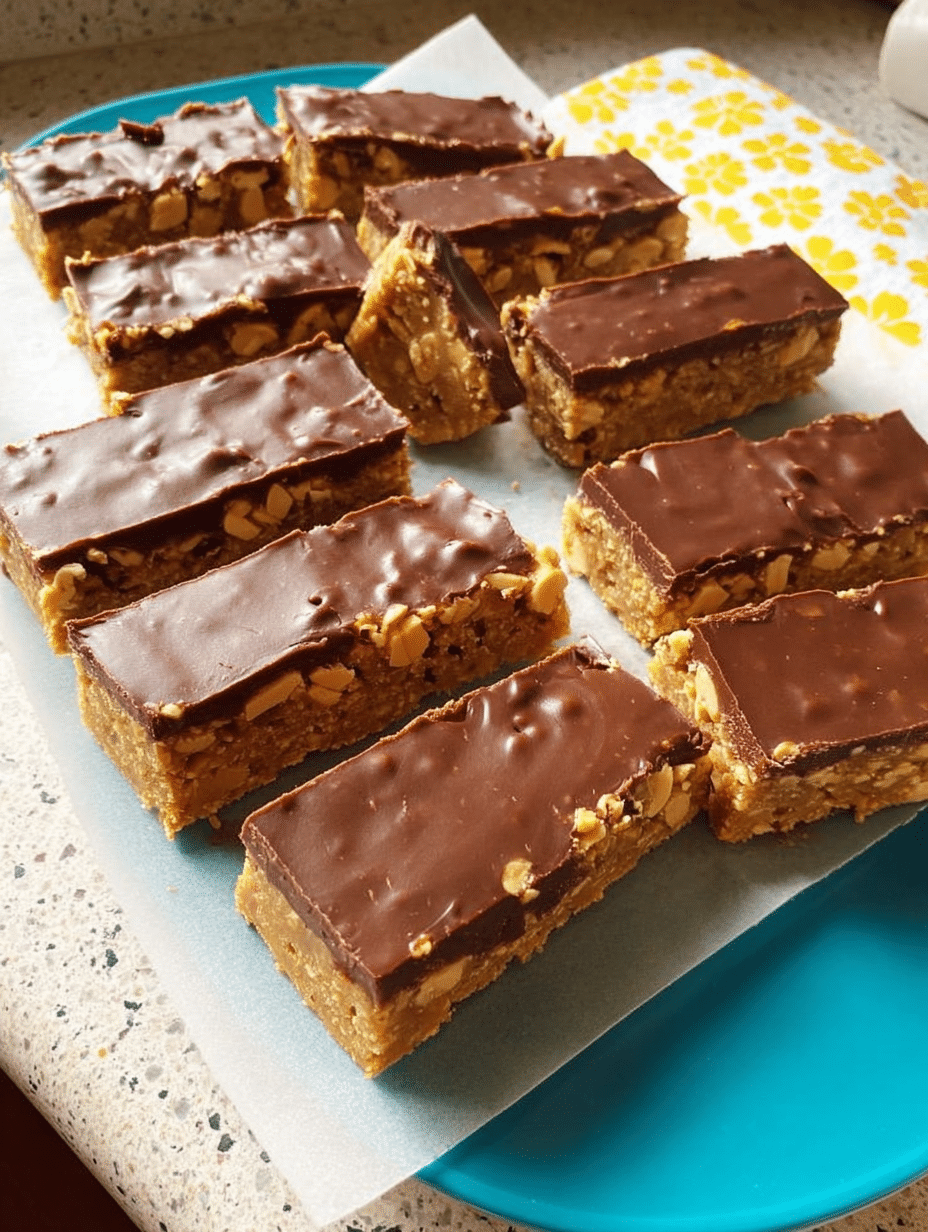
Step-by-Step Instructions
Phase 1: Preparing the Base
- Line a 9×13-inch baking pan with parchment paper and grease the edges lightly with extra butter.
- Crush the vanilla wafers in a food processor until they reach a fine, sandy consistency.
- Cream the softened butter and 1 cup of chunky peanut butter in a large mixing bowl until smooth.
- Fold in the powdered sugar and wafer crumbs gradually until a thick dough forms.
- Mix in the mini chocolate chips by hand to ensure they are evenly distributed throughout the batter.
- Press the mixture firmly into the prepared pan using a spatula or the back of a clean spoon.
Phase 2: Preparing the Topping
- Combine the 2 cups of chocolate chips and 1/2 cup of creamy peanut butter in a microwave-safe bowl.
- Heat the mixture in 30-second intervals, stirring between each session, until the chocolate is completely melted.
- Pour the warm chocolate mixture over the peanut butter base layer in the pan.
- Spread the chocolate evenly to the edges using an offset spatula for a professional finish.
Phase 3: Finishing and Chilling
- Scatter the chopped peanuts across the top of the wet chocolate layer while it is still warm.
- Refrigerate the pan for at least two hours until the chocolate has completely set and hardened.
- Lift the bars out of the pan using the parchment paper overhang before slicing into squares.
Chef Tips for Perfect Results
- Room temperature butter is essential for achieving a cohesive base that does not separate when chilled later.
- Pulse the vanilla wafers into a very fine powder to prevent the bars from crumbling when you cut them.
- Wipe your knife with a warm damp cloth between each cut to produce clean, sharp edges on every bar.
- Select a high-quality sea salt to sprinkle lightly over the top if you prefer a more aggressive sweet-and-salty balance.
- Ensure your chocolate is melted at low heat to avoid seizing, which makes the topping grainy and unappealing.
Common Mistakes to Avoid
- Skipping the Parchment Paper: These bars are very sticky and will adhere to the pan, making removal nearly impossible.
- Using Cold Butter: Attempting to mix cold butter into the peanut butter results in lumps that compromise the structural integrity.
- Overheating the Chocolate: Excessive heat causes the cocoa solids to separate from the fats, resulting in a dull, greyish finish.
- Cutting Too Early: If the bars are not fully chilled, the base will be too soft and the layers will slide apart.
- Inconsistent Crumb Size: Large pieces of wafers create air pockets that make the bars fragile and prone to breaking during storage.
Variations and Substitutions
| Ingredient | Substitution | Impact on Flavor |
|---|---|---|
| Peanut Butter | SunButter (Sunflower Seed) | Provides an earthy, nut-free flavor that is safe for schools and allergies. |
| Vanilla Wafers | Graham Crackers | Introduces a subtle honey and molasses note with a slightly crunchier texture. |
| Semi-Sweet Chips | Dark Chocolate (85%) | Increases the bitterness and antioxidant content while reducing the overall sweetness. |
| Chopped Peanuts | Shredded Coconut | Adds a tropical aroma and a chewy texture contrast to the smooth chocolate layer. |
Serving Suggestions and Pairings
These bars serve as an excellent addition to a high-protein breakfast spread or as a post-workout recovery snack alongside a protein shake. For a formal dessert presentation, serve a chilled square with a dollop of Greek yogurt or a side of fresh raspberries to cut through the richness of the fats. They are also perfect for outdoor activities like hiking or long-distance cycling because they remain calorie-dense and provide sustained energy throughout the day.
Storage and Reheating
| Method | Duration | Instructions |
|---|---|---|
| Refrigerator | 10-14 Days | Store in an airtight container with parchment paper between layers to prevent sticking. |
| Freezer | 3 Months | Wrap individual bars in plastic wrap and place in a heavy-duty freezer bag for long-term storage. |
| Room Temp | 2-3 Hours | Keep in a cool, shaded area; the bars will soften significantly if the ambient temperature exceeds 72 degrees. |
Nutritional Information
| Nutrient | Amount per Serving (Approximate values) |
|---|---|
| Calories | 240 kcal |
| Protein | 8g |
| Total Fat | 18g |
| Carbohydrates | 12g |
| Dietary Fiber | 3g |
| Sugar | 0g (Added) |
Frequently Asked Questions
Can I substitute the vanilla wafers with almond flour?
You can use 1.5 cups of almond flour as a direct replacement for the crushed wafers to lower the net carbs. This substitution creates a slightly softer texture that may require extra chilling time to set properly. Be sure to add a pinch of salt if your almond flour is unseasoned to match the wafer flavor profile.
How do I know when the bars are done?
The bars are ready for slicing once the chocolate topping feels firm to the touch and no longer clings to your finger. This usually requires a minimum of two hours in a standard refrigerator. If the center feels soft when you press the pan, allow an additional thirty minutes of cooling time.
What should I do if my chocolate topping is cracking?
Cracking occurs when the chocolate is too brittle, so adding the creamy peanut butter to the melt as instructed is the best preventive measure. If cracks appear during cutting, let the bars sit at room temperature for five minutes to soften the top layer slightly. Always use a hot knife to melt through the chocolate smoothly without applying excessive pressure.
Can I make these peanut butter bars ahead of time?
You can prepare these bars up to five days in advance without any loss in flavor or texture quality. Store them in the refrigerator in a sealed container to prevent them from absorbing other food odors. They actually improve in consistency after twenty-four hours as the flavors have more time to meld together.
How can I increase the protein content even further?
Replace half of the powdered sugar with a high-quality vanilla or chocolate whey protein isolate powder. This modification significantly boosts the protein-to-carb ratio while maintaining the necessary dry bulk for the base. Avoid using casein protein as it can make the bars excessively dry and difficult to swallow.
Conclusion
Easy sugar-free peanut butter bars are the definitive solution for anyone seeking a high-protein snack that requires no baking and minimal effort. By utilizing the combination of chunky peanut butter and sugar-free chocolate, you create a treat that satisfies the palate while adhering to nutritional goals. Share these with friends or keep them stashed in the freezer for a reliable energy boost. Master the balance of these layers and enjoy the classic, salty-sweet peanut butter flavor.
Print
Easy Sugar-Free Peanut Butter Bars: The Ultimate High Protein Snack
- Total Time: 20
- Yield: 16 Bars
- Diet: Vegetarian
Description
These high-protein, sugar-free peanut butter bars blend creamy and chunky nut butter with a crunchy vanilla wafer base and a soft chocolate topping. Perfect for post-workout fuel or guilt-free snacking without insulin spikes.
Ingredients
1 cup (2 sticks) softened butter
1 cup chunky peanut butter
1/2 cup creamy peanut butter
2 cups sugar-free powdered sugar
1 (12-oz.) box vanilla wafers
2 cups semi-sweet chocolate chips
Instructions
Crush vanilla wafers into fine crumbs using a food processor or pulse in a sealed bag with a rolling pin
Combine crushed wafers with softened butter, chunky peanut butter, and sugar-free powdered sugar
Press the mixture into an 8×8-inch greased baking pan
Microwave the reserved creamy peanut butter and chocolate chips (in 30-second intervals) until smooth
Spread the chocolate mixture evenly over the base
Refrigerate for 1–2 hours until firm
Cut into 16 bars
Notes
Use grass-fed butter for enhanced flavor; substitute coconut oil for dairy-free
Chunky vs. creamy peanut butter combination is essential for texture
For grain-free: use almond flour-based vanilla cookies
Store in an airtight container in the refrigerator for up to 5 days
- Prep Time: 15
- Cook Time: 5
- Category: Fitness
- Method: No-Bake
- Cuisine: American